新手上路总想在jsx的{}里写正常的js语句,特别是赋值语句。js模板引擎带来的习惯。。。然而jsx不想理你并向你抛来了一堆错误。最近有妹子问我为什么不能用赋值语句,这下还真问倒我了,只知道不能却还真不知道为什么,于是去研究了一番。
jsx是什么?
JSX只是函数调用和对象创建的语法糖。
他跟js模板引擎不一样,不是把{和}看成标识符,标识符内的内容当成js执行。
在jsx中{}内的内容是要被转换成dom标签内的内容的。
jsx会变成什么?
jsx毫无疑问是被转化成js,这些js的功能是创建虚拟dom,最终是要填充到页面上的。
譬如:
return (
    <ul>
      {
        testArr.map(function(item) {
          return <li>{item}</li>
        })
      }
    </ul>
)
是要被转成:
_react3.default.createElement(
   'ul',
   null,
   testArr.map(function (item) {
     return _react3.default.createElement(
       'li',
       null,
       item
     );
   })
 )
当然不同的编译器转换结果略有差异,不过结构都一样。
jsx如何转换呢?
常使用的方式是通过编译器,譬如babel,babel有专门的插件jsx和babel-preset-react等。现在react太火了,babel自身就集成了编译jsx的功能。
JSX是函数调用和对象创建的语法糖
在编写JSX时,在 { } 中不能使用语句(if语句、for语句等等),但可以使用求值表达式,它是会返回值的表达式。因为他是要被转成createElement的参数的,稍后会讲到,这些参数是明确的值。
jsx里可以有什么
我们不能直接使用语句,但可以把语句包裹在函数求值表达式中运用。
-
立即执行函数,这个方式有点挫。。。
<div> { function(){ let a; //操作a return a; } } </div> -
三目运算符
<div> { a>b?a:b } </div> -
最好的方式是在
render中先处理好需要的值,在return的{}里只包含简单变量或者函数。
抛砖 - {}里合法内容是有返回值的js语句
1)jsx中直接声明赋值会报错:
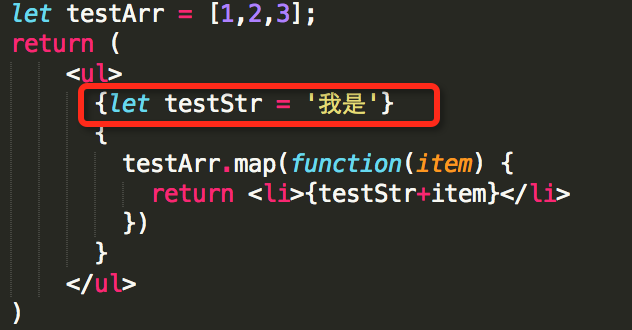
2) 但是这样却可以:
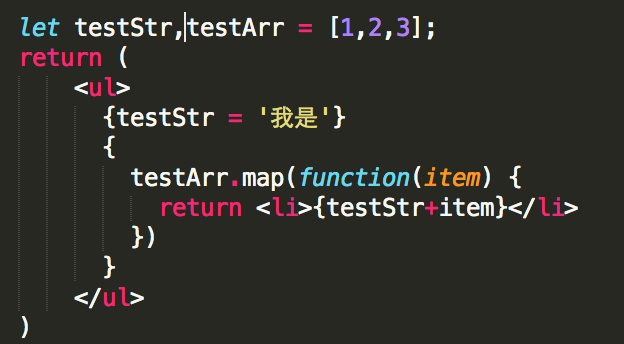
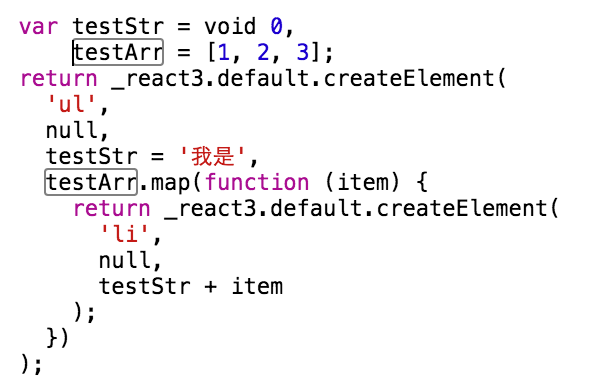
会被编译成:
最终显示在页面上是:
我是
- 我是1
- 我是2
- 我是3
1)中包含了申明语句,其实是let testStr;testStr='我是',关于let testStrjsx编译器内心是懵逼的,这个语句没有返回值啊!但是直接使用testStr='我是'获取的是testStr的返回值,这个值会被直接打印在页面中。
这就跟你在函数中直接return let testStr='我是'会报错,return testStr='我是'获得的返回值是’我是’一样。jsx会将{}当做返回值处理。所有不能放在 return语句里的内容都会报错。
引玉 - 翻出ReactElement核心源码装波逼
ReactElement.js
/**
 * React Element构造器
 */
var ReactElement = function (type, key, ref, self, source, owner, props) {
  // 定义element的基本属性
  var element = {
    // This tag allow us to uniquely identify this as a React Element
    $$typeof: REACT_ELEMENT_TYPE,

    // Built-in properties that belong on the element
    type: type,
    key: key,
    ref: ref,
    props: props,

    // Record the component responsible for creating this element.
    _owner: owner
  };

  if (process.env.NODE_ENV !== 'production') {

    if (canDefineProperty) {
      Object.defineProperty(element._store, 'validated', {
        configurable: false,
        enumerable: false,
        writable: true,
        value: false
      });

      Object.defineProperty(element, '_self', {
        configurable: false,
        enumerable: false,
        writable: false,
        value: self
      });

      Object.defineProperty(element, '_source', {
        configurable: false,
        enumerable: false,
        writable: false,
        value: source
      });
    } else {
      element._store.validated = false;
      element._self = self;
      element._source = source;
    }
    Object.freeze(element.props);
    Object.freeze(element);
  }
  // 定义了element的完整属性后返回
  return element;
};

ReactElement.createElement = function (type, config, children) {
  var propName;

  var props = {};

  var key = null;
  var ref = null;
  var self = null;
  var source = null;

  if (config != null) {
    ref = config.ref === undefined ? null : config.ref;
    key = config.key === undefined ? null : '' + config.key;
    self = config.__self === undefined ? null : config.__self;
    source = config.__source === undefined ? null : config.__source;

    // 将config的内容挂到props下
    for (propName in config) {
      if (config.hasOwnProperty(propName) && !RESERVED_PROPS.hasOwnProperty(propName)) {
        props[propName] = config[propName];
      }
    }
  }

  //如果children不知一个,就放到props.children数组里,留给接下来递归渲染
  var childrenLength = arguments.length - 2;
  if (childrenLength === 1) {
    props.children = children;
  } else if (childrenLength > 1) {
    var childArray = Array(childrenLength);
    for (var i = 0; i < childrenLength; i++) {
      childArray[i] = arguments[i + 2];
    }
    props.children = childArray;
  }

  // Resolve default props
  if (type && type.defaultProps) {
    var defaultProps = type.defaultProps;
    for (propName in defaultProps) {
      if (typeof props[propName] === 'undefined') {
        props[propName] = defaultProps[propName];
      }
    }
  }
  // 创建element
  return ReactElement(type, key, ref, self, source, ReactCurrentOwner.current, props);
};
ReactElement.createElement的功能也就是处理一下获取到的type,config,将锁哥children(子组件)平行放入props属性中,并调用ReactElement获取最终的element。
这个element跟浏览器中dom结构不是一个东西,要看他如何发挥作用,还得看render函数如何操作。下面上的都是简化版的代码了。
render函数简化版:
React = {
    nextReactRootIndex:0,
    render:function(element,container){

        var componentInstance = instantiateReactComponent(element);
        var markup = componentInstance.mountComponent(React.nextReactRootIndex++);
        $(container).html(markup);
        //触发完成mount的事件
        $(document).trigger('mountReady');
}
instantiateReactComponent.js能够根据不同的类型的node返回相应类型的实例。
//component工厂  用来返回一个component实例
function instantiateReactComponent(node){
    //文本节点的情况
    if(typeof node === 'string' || typeof node === 'number'){
        return new ReactDOMTextComponent(node);
    }
    //浏览器默认节点的情况
    if(typeof node === 'object' && typeof node.type === 'string'){
        //注意这里,使用了一种新的component
        return new ReactDOMComponent(node);

    }
	...
}
ReactDOMTextComponent.js生成text类型的component。
//component类,用来表示文本在渲染,更新,删除时应该做些什么事情
function ReactDOMTextComponent(text) {
    //存下当前的字符串
    this._currentElement = '' + text;
    //用来标识当前component
    this._rootNodeID = null;
}

//component渲染时生成的dom结构
ReactDOMTextComponent.prototype.mountComponent = function(rootID) {
    this._rootNodeID = rootID;
    return '<span data-reactid="' + rootID + '">' + this._currentElement + '</span>';
} 这里很好的解释了为何我们能看到react渲染出来的dom总会加上`<span>`标签,纯文本的类型的node都会交给ReactDOMTextComponent来渲染,ReactDOMTextComponent会用`<span>`包裹文本。
ReactDOMComponent.js:核心,将react的element转化成真正的虚拟dom结构的地方。对于虚拟dom的渲染逻辑,本质上还是递归渲染,reactElement会递归渲染自己的子节点。
//component类,用来表示文本在渲染,更新,删除时应该做些什么事情
function ReactDOMComponent(element){
    //存下当前的element对象引用
    this._currentElement = element;
    this._rootNodeID = null;
}

//component渲染时生成的dom结构
ReactDOMComponent.prototype.mountComponent = function(rootID){
    //赋值标识
    this._rootNodeID = rootID;
    var props = this._currentElement.props;
    var tagOpen = '<' + this._currentElement.type;
    var tagClose = '</' + this._currentElement.type + '>';

    //加上reactid标识
    tagOpen += ' data-reactid=' + this._rootNodeID;

    //拼凑出属性
    for (var propKey in props) {

        //这里要做一下事件的监听,就是从属性props里面解析拿出on开头的事件属性的对应事件监听
        if (/^on[A-Za-z]/.test(propKey)) {
            var eventType = propKey.replace('on', '');
            //针对当前的节点添加事件代理,以_rootNodeID为命名空间
            $(document).delegate('[data-reactid="' + this._rootNodeID + '"]', eventType + '.' + this._rootNodeID, props[propKey]);
        }

        //对于children属性以及事件监听的属性不需要进行字符串拼接
        //事件会代理到全局。这边不能拼到dom上不然会产生原生的事件监听
        if (props[propKey] && propKey != 'children' && !/^on[A-Za-z]/.test(propKey)) {
            tagOpen += ' ' + propKey + '=' + props[propKey];
        }
    }
    //获取子节点渲染出的内容
    var content = '';
    var children = props.children || [];

    var childrenInstances = []; //用于保存所有的子节点的componet实例,以后会用到
    var that = this;
    $.each(children, function(key, child) {
        //这里再次调用了instantiateReactComponent实例化子节点component类,拼接好返回
        var childComponentInstance = instantiateReactComponent(child);
        childComponentInstance._mountIndex = key;

        childrenInstances.push(childComponentInstance);
        //子节点的rootId是父节点的rootId加上新的key也就是顺序的值拼成的新值
        var curRootId = that._rootNodeID + '.' + key;
        //得到子节点的渲染内容
        var childMarkup = childComponentInstance.mountComponent(curRootId);
        //拼接在一起
        content += ' ' + childMarkup;

    })

    //留给以后更新时用的这边先不用管
    this._renderedChildren = childrenInstances;

    //拼出整个html内容
    return tagOpen + '>' + content + tagClose;
}
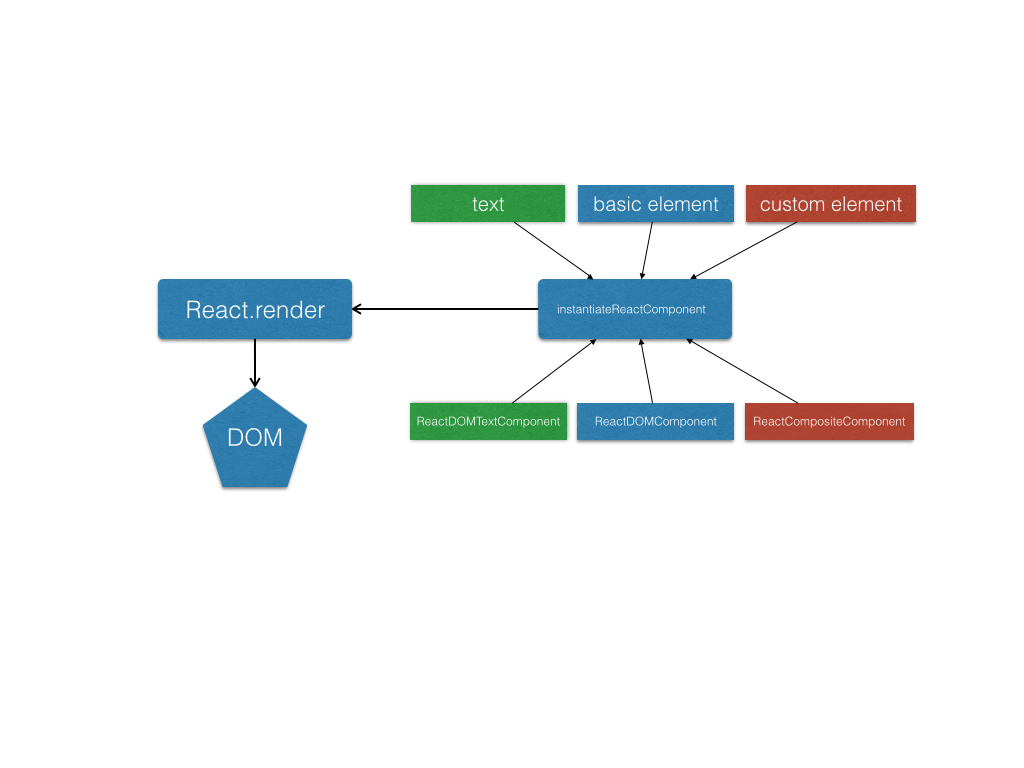
网上找了张图很好的表达了虚拟dom的渲染过程